Sunday, March 29, 2015

Painted Easter Basket

Can you believe Easter is less than a week away?! Are you ready? We found Little Girlie an adorable Easter basket with an attached tutu (!!!), but couldn't find a good basket for Little Man. He ended up settling for a plain Easter bucket from Target because the others were themes that he wasn't into or they were too expensive.

When we got home, I decided it was just too plain, so I asked Little Man if he wanted me to paint something on it. Without missing a beat, he requested a train. Duh-- I should have guessed that! :)
I got out my black paint pen (I used this one) and cheap acrylic paints and started doodling on his Easter bucket. I'm not the best at drawing, so it's far from perfect, that's for sure. Little Man was sitting next to me telling me how to draw the train and which type of train cars should come next. Train drawing is a very precise thing, apparently. ;)
After I drew the outlines, I started filling it in with paint, letting Little Man decide the colors I used. I did have to reign him in a bit, though, or every wheel and tiny detail would have had five colors of paint on it. Haha! 

The first coat went on super thin and transparent. I just roughly painted it in to give the following coats something to stick to. Here it is after the first coat...
It took a total of three coats of paint. I waited for each coat to dry before applying the next coat. When the paint was all dry, I brushed on two coats of Mod Podge to seal it in. 

Here it is all finished and dry! It may look like a kid drew it, but Little Man loves it and that's all that matters! 
What's an Easter train without a car full of Easter eggs (or jelly beans like my hubby thought) and an Easter bunny?!
I was really afraid that the paint would scratch off, but Little Man has already used the basket at our neighborhood egg hunt and it help up beautifully! The two coats of Mod Podge did the trick sealing the paint and there's not a single scratch! 

So, if you are having trouble finding an Easter basket that you like, why not paint your own? 


Wednesday, March 25, 2015

How to Paint a Stairwell Without Hiring Help

Note: This is NOT a sponsored post! Also, please excuse the horrible pictures. The upstairs hall has zero natural light and is dark and shadowy. Most of the pictures in this post were taken by my phone or worse...at night with my phone. Ugg! ;)

Guess what? I painted the stairwell all by myself! Without hiring a painter! I'll admit that I'm ridiculously proud of myself for accomplishing this. I have droned on and on to my husband about it multiple times. Basically, I geek out about it every time I go up or down the stairs. You'd think I just landed a rocket on the moon. :)
In our old house, we took one look at the high stairwell and called our painter. He was reasonably priced and did a fabulous job! No regrets there. However, this time around, I knew that the money to hire a painter would not be in the budget for a long, long time. My options were either wait another year or two or figure out how to paint the stairwell myself.

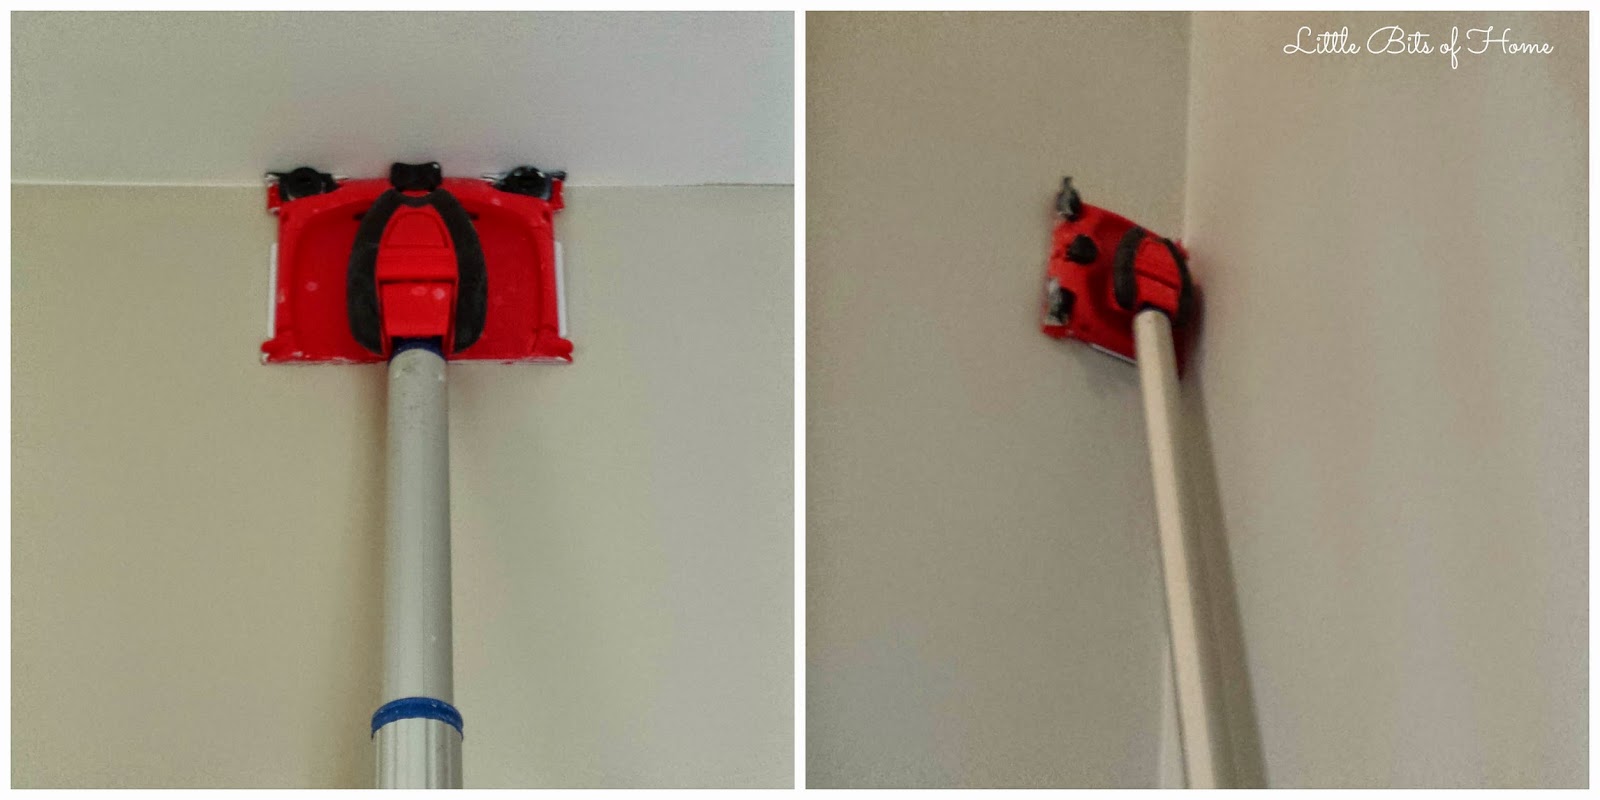
I've been working on a gallery wall for my upstairs hall and didn't want to hang it on dingy, old paint, so the gears in my brain started turning. I remembered a little edger gadget I picked up on a whim a few years ago that I enjoyed using. I had recently noticed the new models were improved and could accommodate an extension pole. That was my light bulb moment! Behold... the $5 gadget that allowed me to paint my stairwell by myself without hiring a pro or needing to buy a special ladder for the stairs!
Image Source: Lowe's

Not only can the new model attach to an extension pole, it swivels all around and now it has two little guards at the top that keep the paint from smearing on the ceiling, so there is no need for painters tape! My biggest holdup with painting the stairs was that it was too high (we don't have a stair ladder) and I wouldn't be able to tape off or cut in. But, with this little gadget, I was able to cut in without needing a ladder or tape!

I taped off the baseboards and door frames then cut in the bottom portion of the walls with my paintbrush. Then, I used the edger to cut in the top edge of the walls, as well as along the sides of each wall. When I did the sides, I turned the edger backward so that the guards were out of the way and I could get paint as close to the corners as possible. Like so...
A couple quick edging tips:

-Practice a few times first to get a feel for the amount of pressure to apply to the edger and how much paint to use. I edged the walls in my hallway first, then edged the stairwell once I was plenty comfortable with the edger. It's very easy to use, but it was helpful to get really comfortable with it before using it while standing on the stairs with it extended 8 feet above my head. ;)

-The guards flip up so they are out of the way when you dip the edger in the paint. Occasionally, if I got too much paint on my edger, when I'd flip the guards back down, they would get a bit of paint on them that I'd need to wipe off. No biggie, but something to be aware of.

-I found that after I dipped my edger, it was helpful if I ever so lightly ran it across the edge of my paint pan to get off any excess paint.

After the cutting in was done, I stood on the stairs or on the landing and rolled using an extension pole. You know you're insanely jealous of my painting attire. ;)
For the corners, I got really high tech. I duct taped my paintbrush to my extension pole. I told you it was high tech! Haha!
If this method is a little too, um, "rustic" for you, look what I found! It's a corner painter made by Shur Line in the same line as the edger! And, it can attach right to your extension pole! It was $5, so I passed and just did my duct taped paintbrush thing. I know, I'm cheap. But, either way will work!
I won't lie, it was labor intensive and a bit tedious, but it saved me a bunch of money and allowed me to check the stairwell off of my list!
I used the same Benjamin Moore Gray Owl paint color I used in the living room, but I had it lightened by 25% because the hallway is so dark. I didn't want it to look really dark with all the shadows. Lightening it by 25% was the perfect amount--it appears to be the same color as the living room, even with all the shadows.

Ready for a little before and after action?

Before...
After!
I'm giving that light and those gold doorknobs a major stink eye! They're on the to-do list!
Next item on the stairwell/hallway agenda? Hang a gallery wall! I already gathered all the frames and have the layout figured out, but I'm still working on gathering photos and artwork. I'm hoping to have it ready to show you next week! 


Monday, March 23, 2015

Conquering the School Paper Monster

Happy Monday! This sunny weather has me motivated to take on a bunch of home projects and clean and organize everything! How about you? 

I don't know about you, but paper clutter is the hardest thing for me to keep organized. It multiplies right before your eyes! Add a child in school and you have papers coming out of your ears! I've been stewing over how to organize Little Man's school projects for several months and finally figured out a solution! 
A couple weeks ago, I stumbled across The Container Store's document boxes. I really liked them and knew they were perfect for school projects and Little Man's artwork, but even on clearance, they were a bit more than I wanted to pay. I thought about it for a couple weeks and ultimately decided that they were worth the $10 per box. They are the large enough to fit big art projects and full sized pieces of construction paper and look neat sitting up on the shelf. Score!
The top box is my inbox for any incoming artwork, projects, and school papers. I can just put them in the box, then periodically sort them. The second box is for papers that I intend to keep. I'll sort through this box at the end of the school year and keep the best of this box. My goal is to put the best projects from each school year into folders, divided by grade like Jen from IHeart Organizing did. Check out her post here

Finally, no more stacks of papers everywhere! How do you deal with school papers and artwork?

Linking up to Savvy Southern Style and many more awesome blogs!

Tuesday, March 17, 2015

A Touch of Easter

Hi Friends! Are you getting ready for Easter? I can't believe it's almost here! I typically don't decorate very much for Easter other than buying a bouquet of tulips for the dining room table. But, with two little kids at home, I'm trying to incorporate some more Easter touches without everything getting too pastel up in here. ;) Here's what I came up with!

Tulips are an Easter staple! I picked up this inexpensive bunch at Trader Joe's. They have such a great selection of flowers and are priced very well!
The vase and table runner are from World Market. Is anyone else as obsessed with World Market as I am?!
I printed off a couple Easter printables from my recent roundup to sprinkle around the house. See that jar of Cadbury eggs? Demolished. History. In our bellies. Hello extra 5 pounds, where did you come from?! Note to self, leaving candy out in the open is way too tempting!
While I was browsing Trader Joe's amazing floral selection, I couldn't resist picking up these ranunculus! Aren't they gorgeous?!
I considered putting them on my dining room cabinet like this, but ended up needing them to take the place of the empty jar of Cabury eggs in my entryway. Ha!
My bestie Amy and I found these adorable bunny garlands in the Target dollar spot a couple weeks ago. Our husbands had a conversation about our matching bunny garlands. I think eye rolling was involved. Ha! But, they're used to use sharing ideas by now. ;)
I couldn't resist adding a little, white pom pom tail! Little Man loved the tails! 
Funny story-- I've seen a couple posts about painting and speckling cheap, plastic Easter eggs. I gave it a whirl, but failed miserably because I used craft paint instead of chalk paint. Then, just a couple days after I posted on Instagram about my miserable fail, Amy and I spotted these cute eggs in the Target dollar spot! They were cheap and looked exactly like I was trying to paint my eggs. Score! 
These glass candle holders from Yankee Candle Co have a lot of mileage on them! Jeremy bought them for me 9 or 10 years ago. I love filling them with seasonal decor! I decided to remove the glass votive holder that sits on top so that I could add more eggs.
Hope you enjoyed this little tour of our Easter touches! Looking forward to celebrating that Jesus is alive!


Monday, March 16, 2015

Inspire Me Monday- Michaels Window Shopping

Note: This is NOT a sponsored post. I was not compensated by Michaels in any way for writing this post. Michaels has no idea who I am, except for the store employees who may have seen me both this morning and this afternoon. Doesn't everyone go to Michaels twice a day? Cough cough... ;)

Hey Friends! Hope you all had a great weekend! I recently popped into Michaels to grab a couple things and was completely sucked into their spring/summer decor aisles. There are some really cute things out right now! I was thoroughly impressed with the style of their decor. The one negative, though, is that much of it was ridiculously overpriced. So many of the items you could DIY for much cheaper, though!

I decided to snap some pictures so that you could window shop with me! These were all taken with my phone while wrangling two kids (Do I get some kind of trophy for that?! Ha!), so please excuse the poor quality pictures. ;)

I'm in love with the coastal/cottage vibe going on in their decor! It's right up my alley! That rope frame and rope mirror would be an easy and inexpensive DIY!
More coastal inspired decor. I swooned over it all, especially that clock! 
Wouldn't these be easy DIY projects? And check out the price tags! $24.99 for a painted piece of wood with random knobs and hooks? $14.99 for a can with a chalkboard label and a fake plant? Adorable, but ridiculously overpriced! You could make these for a fraction of their prices. Sorry Michaels. 
I loved all of their glass bottles and jars mixed with rope. Another easy DIY! Reminds me of this post I saw recently on how to make a knotted rope jar. And that starburst mirror? Love that!
They have a TON of chalkboard items. Tons and tons and all adorable!
And last, but not least, they also had a great assortment of message and bulletin boards. I love that they all have hooks for extra storage. 
Were you sucked into Michael's spring display, too? What were your favorite things? Hope you enjoyed window shopping with me!

Thursday, March 12, 2015

Fireplace Planking Reveal

If you follow me on Instagram, you may remember the sneak peek of our fireplace that I posted after Thanksgiving. We had to finish up the trim pieces after I posted that picture, but I'm finally here today to share with you our big fireplace planking reveal!
You may remember from previous living room posts that we had our TV on a media stand in the corner. Ever since we moved into this house, Jeremy has been suggesting to put the TV above the fireplace. I have never gone for that idea, though, because I love decorating the fireplace and didn't want to decorate around a big black box. But, after his most recent TV relocation suggestion, I realized how much floor space it would clear up in the living room, so started to warm up to the idea. We decided to make a deal: Jeremy got the TV above the fireplace if he built me planking to pretty it up. Mawage Mawage! ;) It's a win win for us both! We will eventually get a slightly bigger TV and mount it to the wall, but that's not at the top of the priority list at the moment.
Jeremy built the planking over Thanksgiving break. We used packages of planking from Home Depot and cut them down to size. Jeremy used his router to made a groove down the side of a 1x2 for the planking to slide into on the each side. He then attached the left 1x2 board with his nail gun, slid in all the planks, then attached the right side board. The planks themselves are in there really right, but are not actually nailed in. They are held in by the side pieces. We chose to build it this way, because we were afraid the nail gun would split the thin planking wood.

This method worked beautifully, but did give us a bit of a hiccup. Even though the planks were tight, they settled a bit over time leaving a tiny gap between the top board and the crown moulding. We decided to add a trim piece to the top and the bottom of the planking to finish it off so we wouldn't have to worry about gaps.

We did our usual Jeremy builds, I paint strategy. If I need to prime something, I usually just do a thin coat of primer then two top coats. But, because of all the knots in the wood, I was really afraid of bleed through. I did two good coats of Kilz oil based primer to ensure no wood grain or knots would be peeking through. After that, I only had to do one coat of white trim paint. Not bad at all!
I LOVE how it turned out! It is so bright and cheerful and adds a nice cottage touch to the living room!

We still need to have the electrician out to rewire the TV, but in the meantime, I rolled up the cords for the pictures so you could see it distraction free. ;)
I've had fun decking out my fireplace in sea glass and white! The candleholders, glass vase, and flowers are from World Market. The white vase is from Target and the white lantern is from Lowe's.
And, just for kicks, a little before and after! 

This picture is from Fall 2012:
And now! 
Next week, I'll share the rest of our living room plans with you. We're getting close to being done!


Linking up at Savvy Southern Style and many more awesome blogs!
Related Posts Plugin for WordPress, Blogger...