Showing posts with label Kids Room. Show all posts

Wednesday, April 6, 2016

Baby Bottles to Battleships: Nursery to Big Boy Room Makeover {Before}


Hey, Friends! I'm so excited to share that we are embarking on our second One Room Challenge this month! The One Room Challenge is put on by Calling it Home every April and October and is so fun! The challenge is to take one room in your house and give it an overhaul in just 6 weeks, posting and sharing your progress every week! Remember last fall when we redid our entire bathroom?
Guess what we're up to this time? Little Man's room! He has been slowly outgrowing his nursery the last couple of years and as much as I try, I just can't seem to slow down time and keep him little forever. So, forward we go! This month, we're taking his room from nursery to big kid!

I realized I have never actually shown you his nursery on the blog before, so enjoy this little trip down memory lane! While we were eagerly awaiting Little Man's arrival, we got to work on his room. Jeremy assembled furniture...


...while I grew our tiny human. Here I am a day before giving birth. 


Just kidding, I was only 5 or 6 months pregnant here. I have the shortest.torso.ever. When I'm pregnant, I look really pregnant. Go big or go home, right? Here's the last belly picture (36 weeks maybe?) before Little Man was born... basketball belly, mom haircut, swollen face and ankles, oh yeah! 


So, back to the nursery. Jeremy's one request was that we paint it blue. I couldn't pick a paint color for the life of me and ended up crying at the paint store because I couldn't decide on a color. Pregnancy hormones don't play, folks. Ha! 

We ended up with a pretty blue that we both loved! It was from Sherwin-Williams, but they have discontinued the exact shade. I should mention, these pictures are from before my blogging days, so excuse the quality. :)


I have never been a huge fan of overly themed rooms, so we went with a simple striped crib bumper and solid green textiles. This was, of course, before I knew that curtains need to touch the ground. Live and learn. And take your curtains down to the floor. ;)

We did bring in some turtle accents, though, which we both loved! The turtle lamp was from my Grandma and aunt and I still love it. The ceramic turtle was an art project Jeremy did in high school! We also had the cutest turtle mobile ever, but I can't find a picture of it. Sad times. The truck was from Jeremy's childhood and his parents collected fun construction vehicles for Little Man to display on it.


Our old house had some cool sloped ceilings, which made for a fun little reading nook in the nursery. That was my favorite spot in the room! 

When Little Man was one, we moved into our current house. To try to keep things calm and familiar, we painted his new room the exact same color and decorated it pretty much the exact same way. I did learn to get longer curtains, though!
When we were pregnant with Little Girlie, we transitioned Little Man into a big boy bed. At that point, we weren't ready to redo his entire room, so we made a few changes and tried to work with the existing paint and curtains. Check out some of the projects we have done to help his room grow with him:


Here's how his room is looking now. I left the table out just how he left it this morning so you could see how little floor space he has left when he's using his table. 


That extra closet shelving we added is still waiting for paint. Clearly, we just purged. This closet is usually a mess because the storage bins are not all within reach for Little Man. 


It's starting to look cluttered and hodge podged. He is in desperate need of more floorspace to play and storage solutions that he can actually reach and that work for his specific toys. *cough* Legos *cough* 

Little Man is growing fast and it's time we get his room functioning for a big kid instead of a baby! He is really into Star Wars, so I know he will flip out if I include some Star Wars in the plans. Again, I don't care for overly themed rooms, so expect some Star Wars accents, but not Star Wars covered everything. ;)

Ready to see where we're headed with the room? 

 Here's what's on our agenda for the next 6 weeks:

-Paint the room.
-Purchase new curtains.
-Purchase new rug.
-Rearrange the furniture
-Add Star Wars art and accessories. 
-Build window seat with storage. 
-Add storage solution for art supplies.
-Paint closet shelves. 
-Get rid of dresser and add closet clothing storage. 

We plan to keep the light, his bed, nightstand, and bedding which definitely helps out the budget!

We decided to keep our room design plans a secret from Little Man and are going to try to pull off surprising him. It's like our own little version of HGTV over here. Ha! I can't wait to see his face when he sees his room and realizes we encorporated Star Wars!

I hope you follow along as we overhaul Little Man's room! Be sure to check out all the other awesome room makeovers going on this month, too! There's some serious talent going on over at Calling it Home!


Tuesday, October 20, 2015

Bright and Cheery Playroom Reveal


Guess what today is?! Playroom reveal day! Cue celebratory music and confetti!!! 
We moved into our current house about 3 1/2 years ago and this was one of the first rooms I started working on. Thankfully, I started blogging as soon as we moved into this house, so I got to document each project along the way!

I'm a believer in letting rooms like this evolve over time and not rushing the process. It may have taken us three years to finish, but we were able to implement storage and organizational pieces into the room that really make it function beautifully for us! So, let's take a tour, shall we? I included links to each individual project post along the way!

Here is the view from the hallway. The built-in was already done when we purchased our home. We've organized it inside and out, refinished a chair for it, and installed a bulletin board (tutorial coming soon!) to make it function well for us.


Little Man colors at this desk for hours! We keep his crayons, colored pencils, and a basket of blank paper on the desktop for easy access. We also have a mail sorter hanging on the side of the bookshelf for him to put his finished drawings which really helps keep his desk clear. Most of the time. ;)


We really thought through how to organize our kids' paperwork and the built-in cabinets. The solutions we came up with are working out really well!


Looking to the left, you'll spot our cozy reading chair corner. The chair used to be in the kids' nursery, but we repurposed it for the room, adding a cute pillow to liven it up.


I love the curtains that we found at Lowe's for this corner and had a friend add the pom-pom border to the bottom!


The same friend (Thanks, Betsy!) took a pillow design I dreamed up and made it come to life for me!


Looking to the left, you'll spy our gallery wall and book ledges. I can't sing the praises enough of book ledges for kids! They can actually get the books out and clean them up independently! #winning 


I switch out the books every now and then to keep it fresh. 


We're still loving the gallery wall we created a couple years ago!


Little Man created the elephant art and the fingerprint animals a couple years back. I'd love to use the same method I used for the elephant to create a different animal with Little Girlie and add it to the gallery!


Turning even more to the left, you'll find our closet that we painted, added additional shelving, and organized. We've switched out a few of the baskets and moved the printer to the office, but for the most part, it looks the same. 


Now let's look at the right half of the room! See that striped wall? That was the first project we did in here 3 years ago and we still love it! It's such a fun, playful addition! And I have an addiction to stripes, but we don't need to mention that. ;)


The bookshelves stumped me for years, but I finally got them arranged in a functional, yet cute way! 


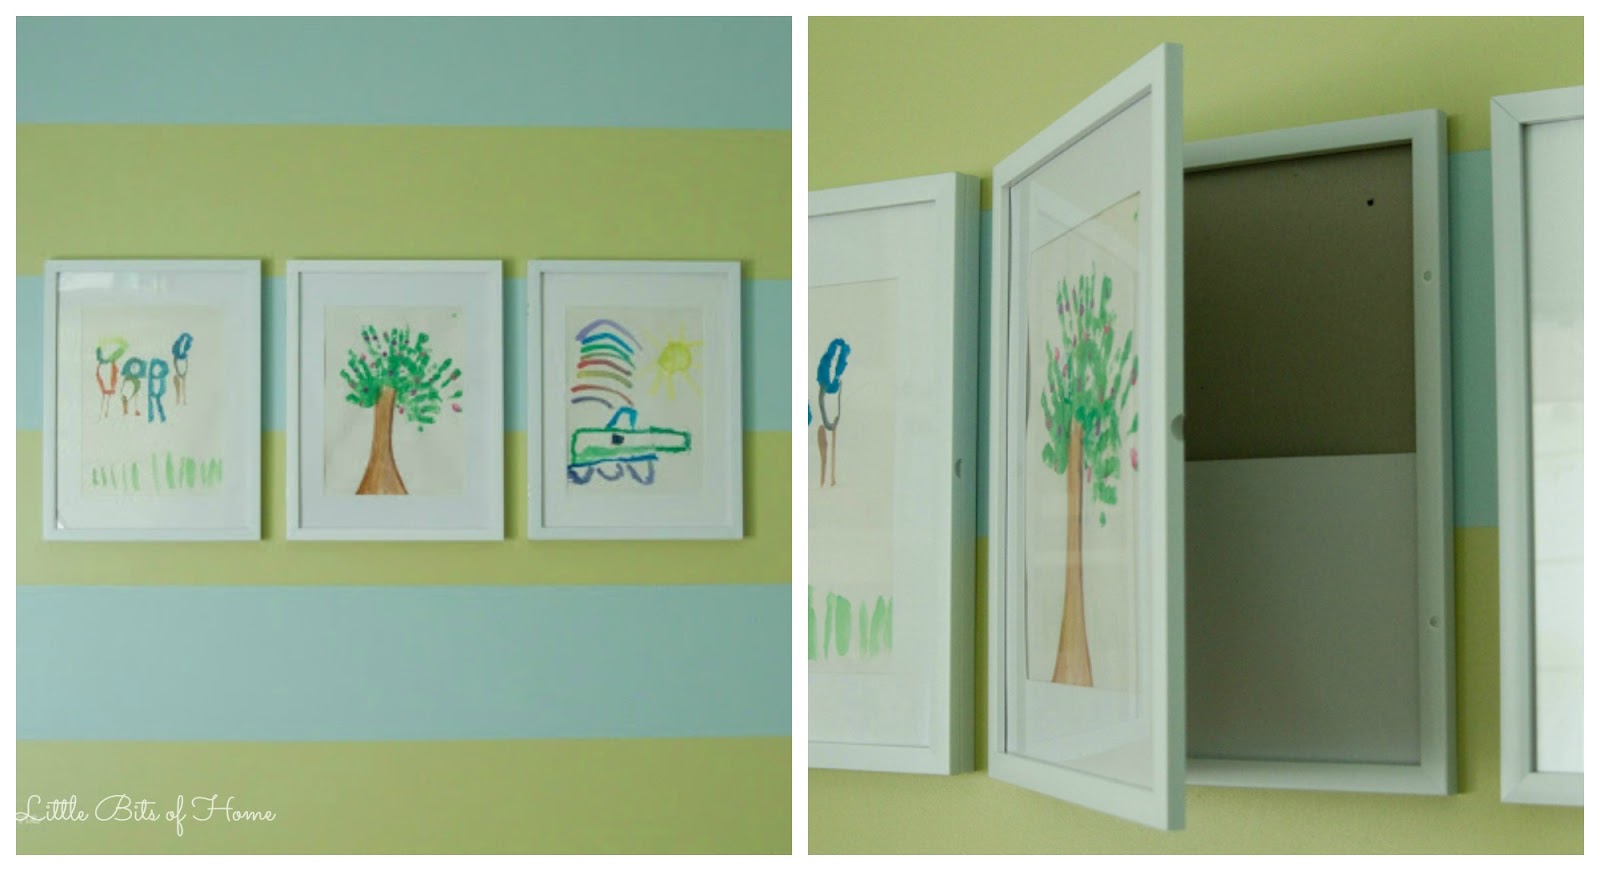
We added frames to display our kids' masterpieces that open up, allowing us to easily switch out the artwork.


Looking to the far right side of the room, you'll find the Hot Wheels parking garage we made recently. It's working out great and the kids love it!


Just a few more details from around the room...

And now the best part! Before and after comparisons! Ready to see how far we've come in 3 years?!

Here's the befores from right after we moved in next to the afters with how it looks now!
I have no explanation... ;)
Clearly, we had just moved in and thrown things into the closet while we were getting settled. #facepalm
Here's the striped wall before and after. We stored some of the larger toys in the kids' closets, moved the workbench to the garage next to Daddy's (so cute!), and parked the shopping cart in the bottom of the playroom closet. Shhhh, don't tell her, but we're building Little Girlie a kitchen for Christmas and it will go on this wall!
And that's a wrap! We're so happy with how it turned out! All of the sweat equity paid off! 

To see all the playroom posts , click here!


Wednesday, February 25, 2015

Repurposed Train Table

When Little Man was nearly two, my husband's boss graciously gifted us a set of trains and tracks that his kids had outgrown. They immediately became my Little Man's favorite toy and thus, the train obsession was born.

For Little Man's second birthday, my husband and I scoured Craigslist and found him a train table. I can't tell you how many hours Little Man has spent at that train table over the past couple of years. He has played with it daily! Every penny spent on the trains, tracks, and table was totally worth it. I dug through old photos and found a picture of the train table all set up to surprise him on his birthday!
The train table has been living in our playroom. It has never quite fit perfectly and is really too large for the room, but it was worth it because of how much and how frequently Little Man enjoyed it. However, as Little Girl has grown and we've added her toys as well, the room quickly become overly cramped.

Our first idea to give us more space in the playroom was to move the train table to Little Man's room. His room is just too small, though. We had been planning on building a slide out Lego table for under Little Man's bed, but it hit me that we could repurpose the train table to function as a train/Lego/activity table instead! We were so excited to find a way to keep his train table for him to enjoy, while still gaining much needed space in the playroom!

The process was really straightforward. Jeremy removed the top boards and center supports (they just lift out), then removed the legs from the table. Then, he reassembled the side boards. The side pieces were originally screwed into the legs, so he replaced the legs with wood blocks he cut to size.
Pro Tip: Use similar types of wood. We used wood scraps and screws we had on hand already, but because the scrap wood was harder wood than the train table was made out of, the nail gun wouldn't work properly. We knew that, but decided to just screw the wood block in from the outside and have visible screws. If this was going to be out in the open all the time, we would have bought a new piece of softer wood for this project so we could use the nail gun and avoid visible screws on the outside. But, honestly, because the train table was going to be stored under the table, the visible screws just weren't a big enough deal to warrant buying a new piece of wood.

He attached casters to the scrap wood block so that the table could roll in and out easily.
Jeremy was super sweet and remembered to take pictures along the way. I secretly think he left sawdust on the caster to add a manly touch. Haha!
Then, I painted the table to match the bed and attached a handle (found at Lowe's) for easy maneuvering. We put the top boards back in place and ta-da, done!
I feel like I should stop right here and add that Little Man's bed never ever ever looks this neat. It's ridiculously hard to make a bed with bed rails! Plus, there are usually 28,495,187 stuffed animals and blankets in his bed. Ha! 
Honestly, this was a very easy project! I'm so happy to have given the train table a new way to continue to function beautifully for Little Man! He absolutely loves it and uses it for trains, Legos, cars, puzzles, etc! Shh, don't tell him, but for his next birthday, we are going to get him some large Lego boards to use on the table. So fun!
I realize that not all train tables are built the same way, so this project may not work for them all. But, if you look, the basic frame would actually be very easy to build if you wanted to make one from scratch!

Click to see how we made the bed rails and for details on the painting!


Linking up to Savvy Southern Style and Cedar Hill Farmhouse! Check the "Link Party" button at the top for more places I link up each week and tons of inspiration!
Related Posts Plugin for WordPress, Blogger...