Thursday, January 28, 2016

How to Frame a Wood Sign

Hey, Friends! As promised, I'm back to spill all the details on how we framed our DIY lettered wood sign! If you missed the tutorial for making the sign, check it out here!


We designed our frame to have a groove inside for the sign to fit into. This allowed us to be able to frame and hang our sign without putting any nails into our sign. Here's how we did it!

Step One- Measure and cut a 1x2" board to the length of each side of your sign, adding 2-3 extra inches per side to allow for adjustments or mistakes. If you try to get a precise measurement before cutting your grooves, your measurements will be off. You'll trim the boards to exact length in Step 4.

Step Two- Next, make a groove in the wood for your sign to slide into. To accomplish this, lower the saw blade so that it is only sticking up about 1/3". Then, place your wood, broad side down, so that one edge of the wood extends about 1/4" past where the saw blade will hit. Place your saw guide along the other side to hold the wood straight, then make your cut all the way down the length of the board. 


After you've made your first groove, you'll repeat the process 2-3 more times on the same board, moving your wood over less than the width of the saw blade each time. As you do this, your groove will gradually get wider and wider. The goal is to get your groove wide enough for your sign to slide into. You want a good, snug fit. We ended up doing 4 passes over the table saw to get the perfect sized groove, but it may take you more or fewer passes depending on your sign width. After each pass over the table saw, do a check to see if your wood will slide over the sign. 

See how the groove gets a little wider with each pass? 


Step Three- Now that you have your grooves finished, dry fit your wood by sliding your two side boards onto the sign. Once your boards are in place, measure the width of your sign inside the side frames. This will give you a precise measurement for the top and bottom boards. Trim your top and bottom boards to your precise measurement. 

Step Four- Dry fit all sides of your frame, squaring up the corners. Both side boards will be too long, so mark and trim off any excess wood. The boards should be in the order below. 
Step Five- Paint or stain your boards. I only bothered painting the sides that would be exposed. Hey, ya gotta save time where you can, right?


Step Six- When the paint or stain is completely dry, assemble your frame and secure it with a nail on each corner. We used a nail gun for this and it made it so easy! You can go back around and fill the groove and nail holes on each corner and touch up your paint, but I found that it wasn't even noticeable on my frame once on the wall, so I didn't need to. Your choice!


Step Seven- Screw two short screws onto both of the back sides of your frame, leaving them sticking out about a quarter of an inch. Make sure not to screw them in too far or they will come out the side of the frame and that would be sad. ;) Wrap and string a wire from the screws to hang your sign. Done!!!


Both the sign and the frame ended up being so much more simple than I anticipated! Can you believe that I had figured out my plans and purchased the supplies months and months ago, then procrastinated because I was intimidated and thought would be hard?! Seriously, if you love these signs, try this method out! It's so simple!


Click here to see the simple and foolproof tutorial for how I made the lettered wood sign!


Tuesday, January 26, 2016

Five Organizing Projects that Flopped

Alright, friends, it's about to get real up in here. Like, real people living real lives with real kids with real busy schedules, kind of real. No pretty, styled pictures today!

Last week, I showed you our top 5 organizing projects that actually worked and stood the test of time. Check out that post if you haven't already and burn the images in your brain, because you'll want to remember them after you see the pictures I'm about to show you. ;)


So, without further adieu, here's five organizing flops from around our house as well as my thoughts on what went wrong and what we're going to do about it. Be sure to check back over the next couple months to see how we remedy the problems!

#1- Under the Kitchen Sink

When we first organized under the sink, we put in a large basket for dish towels, two baskets for napkins and bibs, and a wire shelf for baggies. Not too bad for a cheap storage solution, right? Heh...

What went wrong? The gray basket was too small and is constantly overflowing. It was literally the biggest basket that would fit, so I tried to make it work. But, ultimately, it's too small. The little baskets are the same story. They're too small and hard to access, especially when they're overflowing. The shelf is too long, restricting the gray basket size and slides back and forth causing the baggies to fall everywhere.


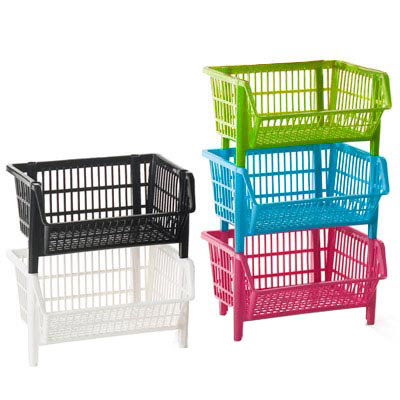
What are we going to do about it? For this space, I think stackable storage baskets that actually fit the space is what we need. I'm thinking either of these would do the trick nicely! 


#2- Winter Accessory Storage

I'll be honest, this one surprises me. Back when I was pregnant with Little Girlie, I was overdue and nesting and threw this hanger and Command Hooks onto the back of the coat closet door to store our winter accessories. It wasn't pretty, but it worked other than having to swing the scarves in as you were closing the door. Because it was working pretty well, I finally broke down and bought an official scarf organizer at Ikea thinking now I'd have more room for scarves and wouldn't have to do any maneuvering to get the door shut. Wrong. It's worse now and driving me nuts!

What went wrong? First, I have accumulated too.many.scarves. I need to purge. Second, not all of our gloves have clips to hang them with, so they get shoved into the bottom of the coat closet. I recently reorganized the coat closet and repurposed the hat basket for wrapping paper storage thinking I could store the hats on the scarf holder. Dumb move! The hats fall off all the time. 


What are we going to do about it? We need two designated baskets on the back of the door to toss gloves and hats into as well as some type of storage for my scarves after I pare down my collection. I'm thinking an over the door Elfa rack would be a great way to go! I like this one, minus the jewelry part.

#3- Kids Schoolwork Storage

I love the boxes I bought for Little Man's schoolwork, the bulletin board is great for displaying masterpieces, there's a paper tray for blank paper, and a mounted paper file for finished work. Each piece is useful and well thought out and we love them. 

So, if we love it so much, what in the world went wrong? This one goes to show you that organizational pieces are useless without a good, established organizational process. Instead of putting completed schoolwork into the "Inbox" and adding favorite pieces into the "Pre-K" box, the papers landed on the desktop because many of them were to finish at home or because I was in a hurry and simply didn't take the extra two seconds to put it in the box. Another reason they ended  up on the desktop is because there is a "waiting period" before papers can disappear, if you know what I mean!

The desk organization didn't work because I didn't spend the time to practice the process with Little Man. He creates several drawings a day, so the papers pile up quickly and in just a couple days the desk and paper trays are literally overflowing. Everything is a masterpiece to him, so getting rid of a papers is hard for him. And, he's 5. There's definitely that factor. :)

The left is the "messy" picture. Thankfully, even though the boxes are completely full and I've started a pile on top, it's not terrible looking yet. The right picture is a picture showing the paper tray and file that I rummaged up. I wish I had a real, messy picture for you, but I just recently helped Little Man go through all of his papers. 


What are we going to do about it? I've been working with Little Man, helping him keep up with his desk and remembering where to put things when he's done. The more we practice, the more it will become second nature to him. I've also been working with him, helping him understand why we can't keep every.single.piece.of.paper that enters our home and helping him purge. He threw away a paper from school the other day and I was so proud of him. It was just a paper that he had glued things to, so there was no sentimental value. The fine motor skill practice was accomplished, so there was no reason to keep the paper anymore and he recognized that. Progress! We also cleared the bulletin board and hung up a new slew of masterpieces that he's super proud to display! 

As for the boxes, I need to break my habit of dumping his papers on his desk and sort them as they come in. Basically, I need to buckle down and use the storage correctly! :) Anyone else get storage solutions and then not use them correctly? Anyone? Crickets?!

#4- Playroom Closet Shelves

Oh boy, this one is bad... Remember our gorgeous closet? Well, the three middle shelves don't look like that anymore, that's for sure. Whomp whomp. 

What went wrong? In a nutshell, it's totally my fault. We moved the printer to the office and I stole the baskets for my dining room cabinet, so suddenly I had shelves of random stuff and no storage bins to contain it all. This closet holds a bunch of random things which makes is so hard to organize. Party supplies, craft supplies, stationary, a file system, coloring books, kids toys, art supplies, camera accessories, electronic cords and accessories, board games, holiday decor... you name it, this is the closet it lives in. Now take that list of stuff and try to organize it using reusable shopping bags you have on hand and this is what you get. A hot mess. Honestly, though, we didn't have the money at the time for new baskets, so we didn't buy baskets. Then, we forgot to add baskets to the budget priority list and this mess is a result. I guess it was out of sight, out of mind?


What are we going to do about it? Get bins! I'm thinking of the same bins that I mentioned for under the sink because they are stackable and the contents are easily accessible without taking the entire bin out. Thankfully, the rest of the closet still looks great, so a few bins and we should be back in order!

#5- Breakfast Nook Basket 

After we installed our favorite shoe cabinet, we popped a cute basket on top for things like keys and sunglasses that we access as we walk in or out the door. However, looking at the bottom picture, you'll notice that keys and sunglasses aren't anywhere to be found in the heaping mess! This one may seem insignificant, but you'd be surprised how much a messy basket can make the entire breakfast nook look cluttered! 

What went wrong? The basket quickly became a place to toss receipts or notes. Then, because our garage is detached, it became the holding spot for tools or hardware/supplies as they came in or were ready to leave the house. At that point, it was messy already, so it further devolved into a spot to put things for Jeremy to sort. It spiraled out of control quickly and hasn't been neat since. 


What are we going to do about it? There's a couple things that need to happen to fix this problem. First, just like I have folders in my mail sorter slots for receipts and coupons, I need to make folders for Jeremy's mail slots, too, so that all of his papers have a clear home. Second, we need to stop making this a holding spot for things that belong in the garage! We have a bin for tools in the playroom cabinet, so we need to start adding project supplies from the garage to that bin while we're working on something instead of letting them pile up in the basket. 


There you have it! My Top 5 Organizing Flops! Do you have any organizing flops around your house? Spill the beans, I'd love to hear about them!

Don't forget to check back on Thursday to see how I framed our DIY Lettered Wood Sign!

Thursday, January 21, 2016

Simple & Foolproof Tutorial for Making Your Own Lettered Wood Sign


*Affiliate links provided for your convenience. For more info, see my full disclosure here.

Are you all as obsessed as I am with the beautiful, lettered wood signs popping up all over the Internet and design world? I love the warmth, texture, and personal touch they add to a room!

The last big to-do for our living room makeover was to figure out some sort of large artwork for above the couch. After seeing my friend's wood sign, I fell in love and knew a wood sign would be a great choice for over our couch. We decided to use part of the chorus of the song "Safe" that my husband sings to our kids all the time. It's sentimental and also a great promise to be reminded of throughout the day!


Of course, after we decided on the text, I started stewing on how to actually DIY the sign. I read countless tutorials, but everything I found either required a projector which I had no access to, or required me to piece together multiple pieces of printed computer paper to fashion a stencil. That seemed like something I was sure to botch and end up with crooked text.

I brainstormed until I finally figured out a simple and foolproof method to making these awesome signs. Don't get overwhelmed by the length of this post-- it's a very simple process! The post is long because I wanted to include a picture of every single step to make the process as easy and straightforward as possible for you! Here's how I did it!

Step One- I started by typing out my text on PicMonkey.com, which you can use for free. We wanted a straight-lined, scripted look, but you could do any style font and layout you'd like! If you don't want all of your text in a perfect line, create your words in individual text boxes for easy maneuvering. PicMonkey has a great selection of fonts to choose from, but you can also use your own fonts which is what I did. 

After I got the text how I wanted it, I saved it in their largest file size called the "Sean" size, like so.


Step Two- Here's my biggest (proudest) lightbulb moment... Make an engineer print of your text to use as a stencil! By doing this, you will have a stencil that is one sheet of paper in the size you need! 


To make your engineer print, simply upload your image to your local office supply store in the size closest to the size of sign you are making. I printed mine in the largest size option. There are two keys to getting a successful print; make sure you save in the largest file size like I showed you above AND be sure to click the "Fit Content to Paper" check box. 


Clearly, I was stoked to have a gigantic stencil to make copying all that text as easy as pie!


Step Three- Now that you have your stencil taken care of, it's time to prep your wood. I like to make the stencil before cutting the wood, because I can use painters tape to hang it on the wall and see if I like the size. Mine was a little taller than I wanted, so I trimmed some of the white space off the top and bottom, then measured my stencil to get the size dimensions for my wood.

Cut a piece of 1/4" plywood to the desired size. We used 1/4" plywood for this project to keep the sign nice and lightweight and easy to hang. Give it a good sand by hand or using an orbit sander. 


Step Four- Paint or stain the wood. If you're going the paint route, I found that rolling the paint on with a foam roller was the fastest way with the best results. 


Step Five- Here's another lightbulb moment... Use graphite transfer paper to transfer your lettering to the wood! My Grandma taught me this method for transferring onto canvases back when she was teaching me to paint. I was thrilled when I tried it out on the wood and it worked like a charm! *Here's the graphite paper I used. 

Graphite paper is a breeze to use. It has a shiny side and a matte size. Place the shiny side down on your wood, then lay your engineer print stencil on top.


Line up your stencil exactly how you want it, then use painters tape to tape it down on two sides to prevent it from moving. I like to only tape on two sides if my graphite paper is not quite as big as the board. That way, I can slip my fingers or the eraser end of a pencil in and move the graphite paper over or down if necessary. 


Now that your graphite paper is down and your stencil is taped into place, use a ballpoint pen to trace firmly along the perimeter of your text. Be sure that the graphite paper is underneath where you are tracing at all times. Depending on how much text you have, this step can take a bit of time, so pop in a movie or watch a football game while you trace! :) 


After you've traced all of your letters, you'll be left with a nice outline on your wood! (This method works great on canvas, too!) If there are any stray marks or if you made a mistake, you can simply erase the mark with a pencil eraser. 


Step Six- Now that you have your stencil transferred to the wood, fill the outline in with paint! Here's my last big tip for you... Use a liner brush to paint flawless lettering! (No, not this kind of liner brush. Ha!) This is another lesson I learned from my Grandma! A good liner brush is only a couple dollars and will get you great results and give you much more control over your lettering. 

Here's *the brush I used. I also have a longer, slightly fuller one that I love, too. I bought mine at Michael's and used a coupon to make it super cheap. I couldn't find it on their website, but check your local store! 


If you've never used a liner brush before, here's a couple quick tips. Roll the brush in a thin layer of paint, then gently roll it on your plate or flat surface to get off any excess paint. You want the paint to be evenly distributed on the brush. When painting, the harder you press and the closer your brush is to the surface of the wood, the thicker the line will be. I recommend using a nice, light touch for the most precise line. Practice a letter or two on some scrap paper to get a feel for it. It's very simple and gives such great results, so it's worth learning!


I used the liner brush for all of the text on my sign. I outlined, then filled, all with the liner brush. I used light pressure for the outline and filled using more pressure on my brush to spread the paint faster. Can you tell I love the liner brush?! My Grandma taught me well. ;)

Again, this step can take a bit of time. I had a little Friends marathon during a couple of Little Girlie's naps and got it done.


Once you're finished lettering, you're done! After it's dry, you could lightly sand to distress it with sandpaper if you'd like, but I chose to leave mine as is. You can prop it up on a mantle, buffet, or dresser or you can frame it and hang it up like we did. If you are interested in seeing how we framed our sign, click here!


We absolutely LOVE it!


We love the style and personal touch it adds to the living room!


I hope this tutorial helps you create your own sign without all the stress! If you do your own sign, I'd love to see it! Send me a picture via email (littlebitsofhomeblog@gmail.com) or facbook or use the hashtag #littlebitsofhomesigns on Instagram and Twitter!

See the tutorial for how we framed and hung our sign here

Linking up with Savvy Southern StyleRemodelaholic, and many other awesome blogs!

Tuesday, January 19, 2016

Top 5 Organizing Projects That Actually Work

Have you ever seen a great, new organization idea, but then wondered if the new system or solution worked long term? I've shared my fair share of organizational projects here on the blog and am going to give you the scoop. The real scoop. The nitty gritty on what worked and what didn't.

Today I'm sharing the top 5 organizational projects I've done around my house that actually worked. And, I'm not talking about worked for a week. I'm talking long term, tried and true favorites. Then, next week, I'll be back to share which projects didn't stand the test of time. Or just simply didn't hold up to distractable me! Ha! So, stayed tuned to hear about my flopped organizational attempts!

Let's get into the successes! Here's my top five in no particular order!

#1- Breakfast Nook Shoe Cabinet

I heart this shoe cabinet! I knew this IKEA cabinet would be a great fit for our breakfast nook soon after we moved in, but the finances weren't right to be spending money on it. I waited for three years for it to creep its way up on the budget priority list. That also meant that I was three years sure I wanted it and it would be a good solution to our shoe storage issues. I LOVE it so much! It holds a ton of shoes and looks stylish while being super practical. I can't recommend it enough!


#2- Hallway Command Center

I have never blogged our command center even though I've had it on the wall in our hallway for as long as we've lived here. Time to remedy that because this spot in the house keeps me organized with our appointments and commitments. In our old house, we had a simple wipe-off calendar on the fridge and it helped me keep up with our schedule better than anything else! I was super disappointed that our fridge in this house is not magnetic so I couldn't continue my fridge calendar. Thankfully, we had the perfect spot in the hallway for a wall wipe-off calendar as well as a little white board for notes and pinning up reminder cards and stamps. Jeremy and I both use and update the calendar, so it's the best way to sync our schedules.

Last year, I hung our Christmas cards with mini clothespins and twine above the calendar. I loved seeing our family and friend's smiling faces there and ended up leaving the photo cards up all year long! I did the same thing this year and it always brings a smile to my face!


#3- Dining Room Teal Cabinet

The teal cabinet has gotten quite a bit of publicity on this blog, but for good reason! With no pantry, this cabinet is a major workhorse for us, storing all of our breakfast foods and snacks. We use it all day long and love it! Bonus points, it is absolutely adorable!


#4- Cabinet Door Organizer

This is by far the simplest organizing solution to make the list, but sometimes simple is what you need, right? A couple years ago, we attached this cabinet door organizer to one of the cabinets under the sink and it has worked great for us! It keeps our wraps and bags accessible without taking up precious drawer space.


#5- Playroom Book Ledges

I LOVE the book ledges we built for the playroom. The ledges allow the kids to see the books at a glance, get them down, and put them back completely independently! So very nice! I love that my kids can be responsible without needing any assistance from me. Win!


What are your best organizational projects? I'd love to hear about them or see links to your posts! 


Related Posts Plugin for WordPress, Blogger...