Wednesday, October 28, 2015

One Room Challenge: Flooring and Lighting


Hey, Friends! Hope you all are having a great week! I'm back for week number 4 of the One Room Challenge! If you need to catch up, here's a recap of Week 1, Week 2, and Week 3

This week, I'm sharing all about the floors and light! Our tile floors were 4 inch beige tiles with white grout and had seen better days. They were cracked in two places that spanned multiple tiles and the grout was dingy after years of use. Since we didn't have the budget or time to gut the tiles and install new tile, we decided to go with the Allure vinyl planks. They were easy on the wallet and could be floated over the top of the old tile. 

First we had to solve the issue of having only subflooring underneath where the vanity used to sit, though. We couldn't float new flooring over it without patching the subfloor first, or the floors wouldn't be level. 

We found a box of 4 inch tiles in the crawl space that were nearly identical to our floor tiles. We're not sure what the story is with the box of tile--it was left behind by the previous owner. But, they were the exact size of the existing floor tiles, so we were able to use them to patch the bare spot in the floor. We bought a couple subway tiles to fill the leftover gap and completely avoided the need to cut any tiles! 

Here's the floors, all patched up. It looks crazy because the colors don't match, but remember, this was just to patch and level out the floors so we could float the new planks on top. 


Side tirade-- I'm the worst at progress pictures! It's so hard to take time out of working to snap decent photos. I usually just quickly snap a picture with my phone and keep working, then kick myself later when the photos are sub par. I'll work on that. ;)

After the floor was patched, Jeremy was able to install the new vinyl planks. We loved that there was no adhesive to mess with! The planks are really thick, though, so cutting them with a utility knife like the directions suggested was pretty laughable. Jeremy ended up cutting them with his table saw for the straight cuts and his jigsaw with a laminate blade attached for precision cuts. That worked really well! The initial row was tricky, because he had to make precise cuts around the shower tile which went to the floor and the marble threshold, but once he got through that row, the process went much faster and easier. 


Once the floors were in, Jeremy installed new baseboards and quarter round to match the rest of the house. I can't tell you how much better it looks now than it did with the dated tile baseboards! Our house suddenly feels newer--it's like Botox for homes. ;)


We also installed a new lighting fixture! Our entire downstairs has all bronze fixtures, so we decided to carry the bronze into the bathroom. I found this Hampton Bay light at Home Depot for only $25 and was immediately sold. It may not be the fanciest or trendiest, but it has nice, clean lines and makes the bathroom look so fresh without breaking the bank!

I promise to get a better shot of the light when I reveal the bathroom!

To bring you up to date, here's our to-do list and what I've shown you so far:

-Demo tile baseboards
-Rip out vanity, toilet, light, fixtures, and mirror.
-Paint. 
-Install new flooring.
-Replace baseboards. 
-Install new light. 
-Install new vanity and sink. 
-Install new faucet and fixtures. 
-Install new toilet. 
-Remove blinds and frost window.
-Decorate!

I mentioned last week that we were actually farther along than this list shows because we were hosting a party and were trying to get the bathroom ready in time. Well, we made it and our guests had a bathroom to use! Whew! We are finished except for filling some nail holes in the baseboards and smoothing out a spot on the wall! I'm dying to show you the rest! Next week, I'll share all the vanity, faucet, and toilet installations and you'll really see it coming together!

Be sure to check out the other One Room Challenge rooms over at Calling it Home!


Linking up with Calling it HomeSavvy Southern StyleRemodelaholic, and many other awesome blogs!

Tuesday, October 27, 2015

Inspired + Resourceful Vignette Challenge

A couple months ago, I was watching Shonee from Hawthorne and Main on Periscope. She's a Periscope rockstar, by the way!  In her video, she collected items from around her mom's house and used them to pull together a vignette. I left really inspired and empowered to be able to make a pretty display for my house, too, with items that I already have lying around.


I asked Shonee and a few other bloggers that I love if they'd be up for doing a vignette challenge and they were game! The rules were simple--create a vignette using items from around the house. Pick and choose items in the vignette from this list: books, natural item, textured item, pumpkin, vase/basket/cylindrical item, textile, something with text, something sentimental.

Here's the pile of things that I rounded up from around my house! Other than my carved bowl full of pumpkins, I hadn't decorated my dining room for fall yet this year. I decided to pull together my vignette for the dining room.


I started by laying the towel in my favorite basket tray. I knew I wanted the big vase on one side, so put a stack of plates on the other side to balance things out.


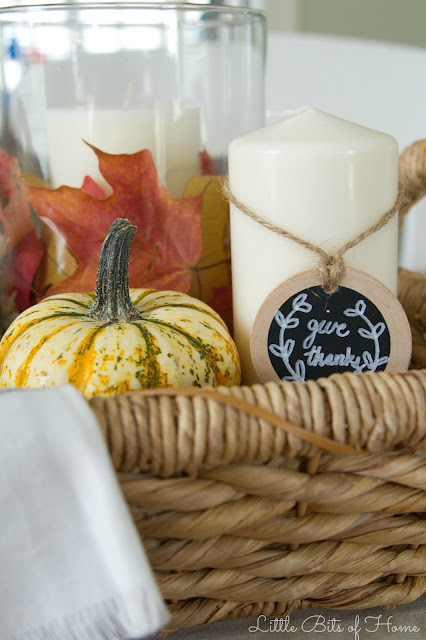
Next, I added a candle and some fall leaves to the vase, then placed the extra candle and pumpkin next to it. I wasn't too thrilled with how low the candle and the pumpkin were sitting inside the basket, so I put a spare napkin ring and the extra chalkboard tags underneath them to build them up. Now you know my tricks. ;)


Here's how it turned out! I love how cozy it makes the room feel!


I love the addition of the fall dish towel! It's something I wouldn't have thought to include had it not been for this challenge! And don't get me started on that cute little pumpkin sitting on top of the stack of plates. Everything is better topped with a mini pumpkin, right?! ;)


A couple years ago, I bought a vase of forced tulip bulbs. I've been hanging onto the vase ever since because I figured it would come in handy. It was the perfect size to throw a candle and some fall leaves in! All I need to do is switch out the leaves for berries in a few weeks and I'll have a pretty decoration for Christmas!


For my text element, I remembered these chalkboard tags I found in the Target dollar spot and picked up for an organization project. The tag was the perfect size to wrap around my candle!


The great part of putting it all inside the tray is that I can move it around easily! I finally decided to make my vignette land on the teal cabinet and I love how it plays off the baskets inside.


I hope this encourages you to pull together items from your home to make something beautiful! Be sure to check out all the gorgeous vignettes and leave them some love!


Little Red Brick House

Hawthorne and Main

Little House of Four

Meet the B's

Little Bits of Home


Linking up with Savvy Southern StyleRemodelaholic, Thrifty Decor Chick, and many other awesome blogs!

Wednesday, October 21, 2015

One Room Challenge: Paint & A Free Printable for You

We are still chugging along with our bathroom makeover for the One Room Challenge! If you need to catch up, here's a recap of Week 1 and Week 2!


This week is all about paint and sourcing artwork! I really wanted a spa-like light blue paint with green/gray undertones to compliment the shower curtain and rug I picked out. Here's my mood board for the bathroom to refresh you memory of our bathroom plans.


If you remember, it took me 8 paint color samples to finally pick a color for our living room. I'm so indecisive! This time, I was determined to just make a decision and go with it. I pulled a bunch of paint swatches, looked at them in the room and held them up to the shower curtain and rug, and researched the colors online to see how they looked in a finished room. Then, I made my decision and bought my paint without painting a sample on the wall. Want to take a guess at how that worked out? Yeah, not so great. :(

I picked Benjamin Moore's Ocean Air mixed in the cheap Glidden paint at Home Depot. I got all the cutting in done and stepped back to realize that it was not quite what I was going for. It was pretty, but kind of juvenile. I held up the swatch and the color was ever so slightly off. It was missing the gray undertones to tone it down a notch. Grrr.


Home Depot would not let me return the paint even though it wasn't exactly the same color as the swatch, but they did tweak it for me. I pulled some paint samples from my leftover living room sample palooza and tried them on the wall, then picked one that was closer to what I was going for in the bathroom. I took the sample to Home Depot and the man at the paint counter color matched it and figured out how much of each pigment it had in it, then used that information to tweak my paint color. It helped, but it's still not exactly what I wanted. Now it's missing the green undertones! But, I didn't have the time, money, or energy to repaint with an entirely new color, so I went with it. Here's a little peak!

*Side notes-- While they were tweaking my paint color, they told me that Glidden paint has a tendency to not mix colors perfectly. I was not impressed with the inexpensive Glidden paint and won't bother using it again. It was really thin in addition to the color mixing issue. Sherwin Williams and Behr (if I'm on a tight budget) are my go-to paints that never fail me, but I was trying to save money this time. #fail

Also, I just read this post by Meadow Lake Road on picking paint colors and thought she was spot on. Follow her advice, friends!


I also shopped around for a print to hang in the bathroom. I love the look of watercolor floral artwork mixed with pretty fonts and verses. I was having a hard time finding the perfect pairing of a verse I wanted plus watercolor that I loved.

Then, my friend posted an Instagram photo of 2 Timothy 4:17 and I knew instantly that it was exactly what I wanted. I decided to just make some artwork myself! I used her photo as inspiration for my text layout and purchased the same watercolor clipart featured in the artwork I included on my bathroom mood board. I'm no graphic designer, but I'm really happy with how it turned out and love the verse!

To thank you all for being such a great, encouraging group of readers, I'm offering you the print I made for free! Click here to download the PDF!


To bring you up to date, here's our ever growing to-do list and what I've shown you so far:

-Demo tile baseboards
-Rip out vanity, toilet, light, fixtures, and mirror.
-Paint. 
-Install new flooring.
-Replace baseboards. 
-Install new light. 
-Install new vanity and sink. 
-Install new faucet and fixtures. 
-Install new toilet. 
-Remove blinds and frost window.
-Decorate!

Now, full disclosure time... We are way ahead of schedule because this is our downstairs bathroom. We're hosting a birthday party in a couple days for Little Man and kind of need a bathroom for our guests! Ya know, it's the little things in life... Ha!

Be sure to check out the other projects over at Calling it Home! There is so much talent on display!


Linking up with Calling it HomeSavvy Southern StyleRemodelaholic, Thrifty Decor Chick, and many other awesome blogs!

Tuesday, October 20, 2015

Bright and Cheery Playroom Reveal


Guess what today is?! Playroom reveal day! Cue celebratory music and confetti!!! 
We moved into our current house about 3 1/2 years ago and this was one of the first rooms I started working on. Thankfully, I started blogging as soon as we moved into this house, so I got to document each project along the way!

I'm a believer in letting rooms like this evolve over time and not rushing the process. It may have taken us three years to finish, but we were able to implement storage and organizational pieces into the room that really make it function beautifully for us! So, let's take a tour, shall we? I included links to each individual project post along the way!

Here is the view from the hallway. The built-in was already done when we purchased our home. We've organized it inside and out, refinished a chair for it, and installed a bulletin board (tutorial coming soon!) to make it function well for us.


Little Man colors at this desk for hours! We keep his crayons, colored pencils, and a basket of blank paper on the desktop for easy access. We also have a mail sorter hanging on the side of the bookshelf for him to put his finished drawings which really helps keep his desk clear. Most of the time. ;)


We really thought through how to organize our kids' paperwork and the built-in cabinets. The solutions we came up with are working out really well!


Looking to the left, you'll spot our cozy reading chair corner. The chair used to be in the kids' nursery, but we repurposed it for the room, adding a cute pillow to liven it up.


I love the curtains that we found at Lowe's for this corner and had a friend add the pom-pom border to the bottom!


The same friend (Thanks, Betsy!) took a pillow design I dreamed up and made it come to life for me!


Looking to the left, you'll spy our gallery wall and book ledges. I can't sing the praises enough of book ledges for kids! They can actually get the books out and clean them up independently! #winning 


I switch out the books every now and then to keep it fresh. 


We're still loving the gallery wall we created a couple years ago!


Little Man created the elephant art and the fingerprint animals a couple years back. I'd love to use the same method I used for the elephant to create a different animal with Little Girlie and add it to the gallery!


Turning even more to the left, you'll find our closet that we painted, added additional shelving, and organized. We've switched out a few of the baskets and moved the printer to the office, but for the most part, it looks the same. 


Now let's look at the right half of the room! See that striped wall? That was the first project we did in here 3 years ago and we still love it! It's such a fun, playful addition! And I have an addiction to stripes, but we don't need to mention that. ;)


The bookshelves stumped me for years, but I finally got them arranged in a functional, yet cute way! 


We added frames to display our kids' masterpieces that open up, allowing us to easily switch out the artwork.


Looking to the far right side of the room, you'll find the Hot Wheels parking garage we made recently. It's working out great and the kids love it!


Just a few more details from around the room...

And now the best part! Before and after comparisons! Ready to see how far we've come in 3 years?!

Here's the befores from right after we moved in next to the afters with how it looks now!
I have no explanation... ;)
Clearly, we had just moved in and thrown things into the closet while we were getting settled. #facepalm
Here's the striped wall before and after. We stored some of the larger toys in the kids' closets, moved the workbench to the garage next to Daddy's (so cute!), and parked the shopping cart in the bottom of the playroom closet. Shhhh, don't tell her, but we're building Little Girlie a kitchen for Christmas and it will go on this wall!
And that's a wrap! We're so happy with how it turned out! All of the sweat equity paid off! 

To see all the playroom posts , click here!


Related Posts Plugin for WordPress, Blogger...