Showing posts with label Playroom. Show all posts

Thursday, March 17, 2016

Anthropologie Inspired Ikea Play Kitchen Hack


Hey, Friends! I've been so excited to show you this little Ikea hack for months now! Little Girlie had been raiding my kitchen pans and utensils for items to play with, so we decided to buy her the Ikea play kitchen for Christmas. I was super excited to give it to her since I loved my play kitchen as a kid! Of course, you know I just had to jazz it up a bit for her!


Little Girlie is into pink and purple, bows, jewelry, and accessories right now, so I wanted to give it a feminine touch without being too in your face pink, if you know what I mean. ;) I have LOVED this Anthropologie wallpaper for years and wanted to use it for the backsplash on the kitchen, but it was way out of the budget. Instead, I grabbed some craft paints and got to painting! 

We cut a 1/4" sheet of plywood to fit the opening in the back of the kitchen, leaving a lip so we could nail it in. After giving it a good sand, I rolled the entire thing in a pretty blue-green. 


For the flowers, I used two shades of pink for the petals and just randomly alternated the colors as I went around. If you look closely, you will see the petals are just blobs with a bit of blank space in between. Super easy! For the leaves, I painted them in one shade of green, then streaked on another shade of green. The trick here is to not have very much paint on your brush so the bottom color peeks through. Again, super easy, I promise! The centers are just yellow paint that I dotted on, followed by a few dots of darker yellow. 

I left off some of the details from the original wallpaper, because, elementary painting skills, that's why. ;) That's why I called it "Anthropologie Inspired" instead of "Anthroplogie Dead Ringer". Haha! 


After the backsplash was dry, we just attached it to the kitchen from the back! That's it! I really wanted to paint the wood parts of kitchen white, but decided against it for durability sake. I knew it would be played with hard and didn't want to worry about the paint chipping on the more trafficked areas of the kitchen. 


I love how the colors tie into the playroom decor and add a feminine touch! 


Now it's the perfect place to sip some pretend tea made by the sweetest little girl I know. 


I added a couple kid-safe finishing touches to the top cubbies since Little Girlie is too short to reach those spaces anyway. The tin vase is from the Dollar Spot and the frame was one my Grandma had that she picked up at the Dollar  Tree. See where I get my dollar item obsession from? I like that the frame is sentimental and that it doesn't have glass in case it falls. 


Little Girlie was SO excited about her kitchen on Christmas day! She opened it up then ran over and gave me a big hug before playing with it. Love!


Tuesday, October 20, 2015

Bright and Cheery Playroom Reveal


Guess what today is?! Playroom reveal day! Cue celebratory music and confetti!!! 
We moved into our current house about 3 1/2 years ago and this was one of the first rooms I started working on. Thankfully, I started blogging as soon as we moved into this house, so I got to document each project along the way!

I'm a believer in letting rooms like this evolve over time and not rushing the process. It may have taken us three years to finish, but we were able to implement storage and organizational pieces into the room that really make it function beautifully for us! So, let's take a tour, shall we? I included links to each individual project post along the way!

Here is the view from the hallway. The built-in was already done when we purchased our home. We've organized it inside and out, refinished a chair for it, and installed a bulletin board (tutorial coming soon!) to make it function well for us.


Little Man colors at this desk for hours! We keep his crayons, colored pencils, and a basket of blank paper on the desktop for easy access. We also have a mail sorter hanging on the side of the bookshelf for him to put his finished drawings which really helps keep his desk clear. Most of the time. ;)


We really thought through how to organize our kids' paperwork and the built-in cabinets. The solutions we came up with are working out really well!


Looking to the left, you'll spot our cozy reading chair corner. The chair used to be in the kids' nursery, but we repurposed it for the room, adding a cute pillow to liven it up.


I love the curtains that we found at Lowe's for this corner and had a friend add the pom-pom border to the bottom!


The same friend (Thanks, Betsy!) took a pillow design I dreamed up and made it come to life for me!


Looking to the left, you'll spy our gallery wall and book ledges. I can't sing the praises enough of book ledges for kids! They can actually get the books out and clean them up independently! #winning 


I switch out the books every now and then to keep it fresh. 


We're still loving the gallery wall we created a couple years ago!


Little Man created the elephant art and the fingerprint animals a couple years back. I'd love to use the same method I used for the elephant to create a different animal with Little Girlie and add it to the gallery!


Turning even more to the left, you'll find our closet that we painted, added additional shelving, and organized. We've switched out a few of the baskets and moved the printer to the office, but for the most part, it looks the same. 


Now let's look at the right half of the room! See that striped wall? That was the first project we did in here 3 years ago and we still love it! It's such a fun, playful addition! And I have an addiction to stripes, but we don't need to mention that. ;)


The bookshelves stumped me for years, but I finally got them arranged in a functional, yet cute way! 


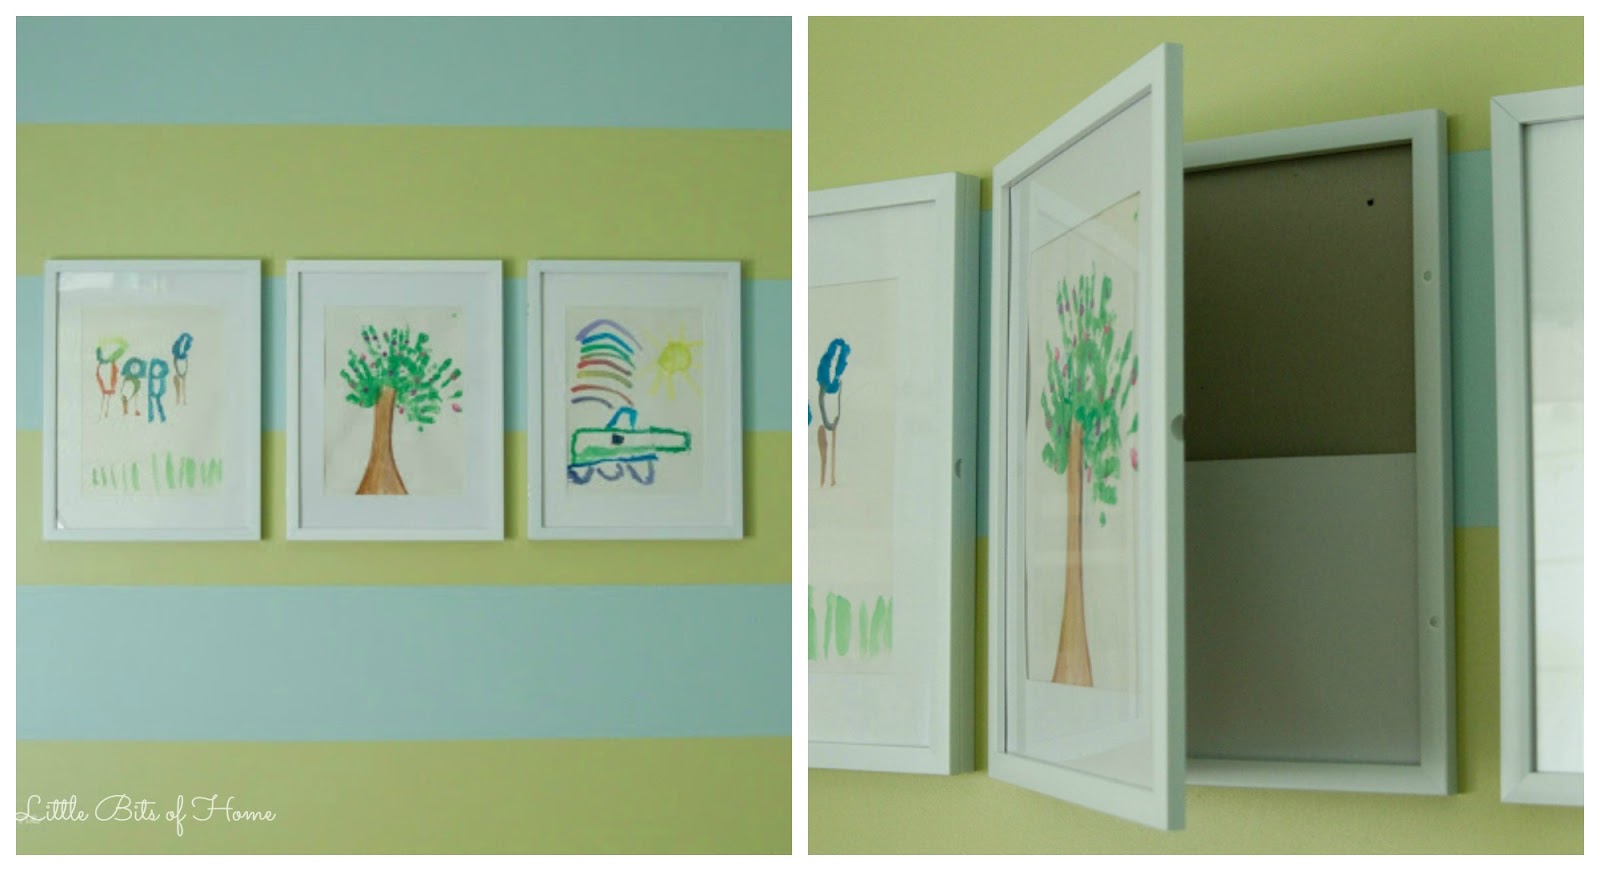
We added frames to display our kids' masterpieces that open up, allowing us to easily switch out the artwork.


Looking to the far right side of the room, you'll find the Hot Wheels parking garage we made recently. It's working out great and the kids love it!


Just a few more details from around the room...

And now the best part! Before and after comparisons! Ready to see how far we've come in 3 years?!

Here's the befores from right after we moved in next to the afters with how it looks now!
I have no explanation... ;)
Clearly, we had just moved in and thrown things into the closet while we were getting settled. #facepalm
Here's the striped wall before and after. We stored some of the larger toys in the kids' closets, moved the workbench to the garage next to Daddy's (so cute!), and parked the shopping cart in the bottom of the playroom closet. Shhhh, don't tell her, but we're building Little Girlie a kitchen for Christmas and it will go on this wall!
And that's a wrap! We're so happy with how it turned out! All of the sweat equity paid off! 

To see all the playroom posts , click here!


Tuesday, August 18, 2015

Playroom Progress: Organized Cabinets


Hope you all had a great weekend! I spent the weekend at the lake with a couple of my favorite friends and it was mar-vel-ous! Huge thanks to my hubby for staying home with the kids so I could get away!

I'm inching across the finish line in the playroom and am so excited about my latest project! When we first moved into this house 3 years ago, we put a bunch of random things into the playroom built-in cabinets, intending to organize it at some point when we got settled. Well, that some point apparently never came, because here's what it looked like until last week.


Scary, right?! Even with the doors closed, you could tell there was chaos lurking behind the frosted glass...

I finally got up the gusto to get a handle on the crazy and emptied it all out. I purged A TON and only kept what we really use and need. Ready to see what it looks like now?


Way, way, waaaaay, better!

As you can see, I moved the shelf up to accommodate inexpensive square storage bins that I picked up at Target. I used the square bins to store paints, Play-Doh, household tools (our garage is detached, so we keep a small set of tools in the house for easy access), and household items like batteries and the pencil sharpener.


I labeled the bins with chalkboard labels that I found in the Target dollar spot. Aren't they cute?! A total steal!


On the top shelf, I reused some plastic storage bins I had on hand to store our user manuals, my acrylic and oil paints, and my craft paints.


To keep the clear bins from looking messy, I slid a piece of cute scrapbook paper in the front, then popped on the lid. I finished off the bins with chalkboard labels.


So much neater! I love how the turquoise bins pick up the turquoise accents around the room!


Gotta love a good before and after!


Next time you see the playroom on the blog, it will be for the grand reveal! Hooray!


Linking up to Remodelaholic and many other awesome blogs!

Monday, July 6, 2015

Hot Wheels Parking Garage

Hope you all had a wonderful holiday weekend! Hubby has been busy on a big project (get a sneak peek on Instagram!) and I've been helping where I can and trying to get over these pesky shingles. I woke up feeling much better than I was previously feeling, so fingers crossed that I'm on the upswing! :)
I'm so excited to be joining up again with a group of fabulous bloggers for our monthly blogger challenge! This month our theme was Pinterest Inspired. I have been eyeing car wall storage like this and this for a while now, so our challenge was the perfect push to get it done!
I decided to come up with my own building plans for this project. Most of the car storage racks I've seen have shelves that are held together by dowels on the sides. I wanted more of a clean, straight lined look, so we simply used pine 1x2 boards for the shelves and side. We attached everything with our nail gun, then used wood filler to fill the nail holes before sanding and giving the entire thing a couple coats of white spray paint. Jeremy was so sweet and built the entire thing for me. He did an awesome job! All I had to do was design and paint!
See that white board in between the shelves? Instead of needing to measure in between all ten shelves, Jeremy made himself a spacer from some scrap wood. It saved him a bunch of time!
Coffee + Painting= Relaxation :) 

For a little extra pizazz, I used scraps of wood to create buildings to go across the top. I painted them with cheap craft paint then used wood glue to attach them to the top. I was going for whimsical and child-like, so I didn't worry about adding too many details or making sure all of my lines were straight. Conveniently, child-like is about as high as my painting skills go. Ha! You could really get carried away and add lots of details like lines to look like brick or cute little flower boxes in the windows. Or, you could cover the wood scraps with cute scrapbook papers for patterned buildings. Whatever floats your boat!
We hung the car rack on two nails (one is in a stud) in a corner of the playroom. Here's how this corner of the playroom is looking now!
I absolutely love doing projects for Little Man, because his reactions are always precious. He didn't disappoint and enthusiastically complimented our work and excitedly filled all the shelves. Love!


Check out these other awesome projects from our July Pinterest Inspired challenge! 

Colorful Summer Rope Wreath

DIY Beachy Accents

Vintage Doily Table Runner

DIY Striped Growth Chart

Hot Wheels Parking Garage

DIY Sunburst Mirror
Related Posts Plugin for WordPress, Blogger...