Showing posts with label Easter. Show all posts

Tuesday, March 15, 2016

Beautifully Simple Easter Tablescapes

If you've been reading my blog for long, you know that I'm a less is more kind of girl. Simple decor and I are BFF. I like my home to feel calm and soothing and simple decor is one way that I accomplish that effect!


When it comes to tablescapes, I predictably stay on the simple side. If the table is too crowded, I feel claustrophobic while I'm trying to eat, which is not the relaxing and enjoyable dinner experience I'm after. I rounded up some of my favorite simple Easter tablescape from around the web, just for you! I love that they are all beautiful without feeling cluttered or overdone! I seriously love all of these and am having trouble picking which one to do for our Easter table! Enjoy!

Please pin from the original source! 


via BHG


Which one is your favorite?


Thursday, March 10, 2016

Easter Egg Topiary

Hey, Friends! Hope you are having a great week! Popping in really quick to show you another piece of our Easter decor!


I saw Kim from Sand & Sisal's egg topiaries and got all heart eyed over them! I happened to have a bunch of Easter eggs from last year's Easter display, so decided to make my own topiary for the entry way.


I followed Kim's tutorial, except I used pre-painted eggs and instead of purchasing a styrofoam cone, I just make a cone out of poster board.


I tried a couple different dishes for the base, but nothing was quite right. I finally got creative and rested my topiary on a cappuccino mug! There were some really cute hobnail mugs at Target that would have been fancier, but my friends reminded me that I should pick the best one for drinking coffee. The big, fat cappuccino mug won, hands down. Ha! #priorities


I love how it looks in our entry! It's festive without being too in your face Easter pastels, you know?

Have a great weekend and be sure to soak in some of this sunshine!


Linking up with Savvy Southern Style, Remodelaholic, and many other awesome blogs!

Thursday, March 3, 2016

Quick & Easy Easter Bunny Craft

*Affiliate links provided for your convenience. For more info, see my full disclosure here.

Thank you so much for all of your sweet comments regarding my last post about losing my grandma. I go back and forth from disbelief to feeling liking I can't breathe from the weight of it. But, your comments were a bright spot, especially the ones with stories of Grandma. I love hearing how much others loved her! She had a big fan club! 

I'm trying to get back into the swing of things around the house and get things decorated for Easter. I don't do a whole lot for Easter, just a few cute touches here and there. I decided to make a bunny to add to my everyday centerpiece and just love how it turned out!


Here's what I started with: a wooden bunny from Michael's (scored this week for only $2!), craft paint*, Mod Podge*, paint brush, scrapbook paper, and twine (not pictured). 


I started out by giving the bunny two coats of white paint. When that was dry, I attached strips of scrapbook paper to the edges using thin dabs of hot glue. Then, I gave the entire thing a coat of Mod Podge to seal it off. 

I was going to stop there, but the seam where the paper met the wood was bugging me. It wasn't laying flat. Maybe I should have used fabric instead of paper and attached it with Mod Podge? Anyway, I decided to hot glue twine around the edges to finish it off and cover up the seam. That worked great and I ended up liking the last minute twine addition! #happyaccident
I mean, look at that cute little bunny bum! 


I love how it looks peeping out of our table centerpiece! 


This little guy didn't take much time at all and is such a cute Easter touch! What are you doing to decorate for Easter? Do you go all out or add just a few touches? 

Sunday, March 29, 2015

Painted Easter Basket

Can you believe Easter is less than a week away?! Are you ready? We found Little Girlie an adorable Easter basket with an attached tutu (!!!), but couldn't find a good basket for Little Man. He ended up settling for a plain Easter bucket from Target because the others were themes that he wasn't into or they were too expensive.

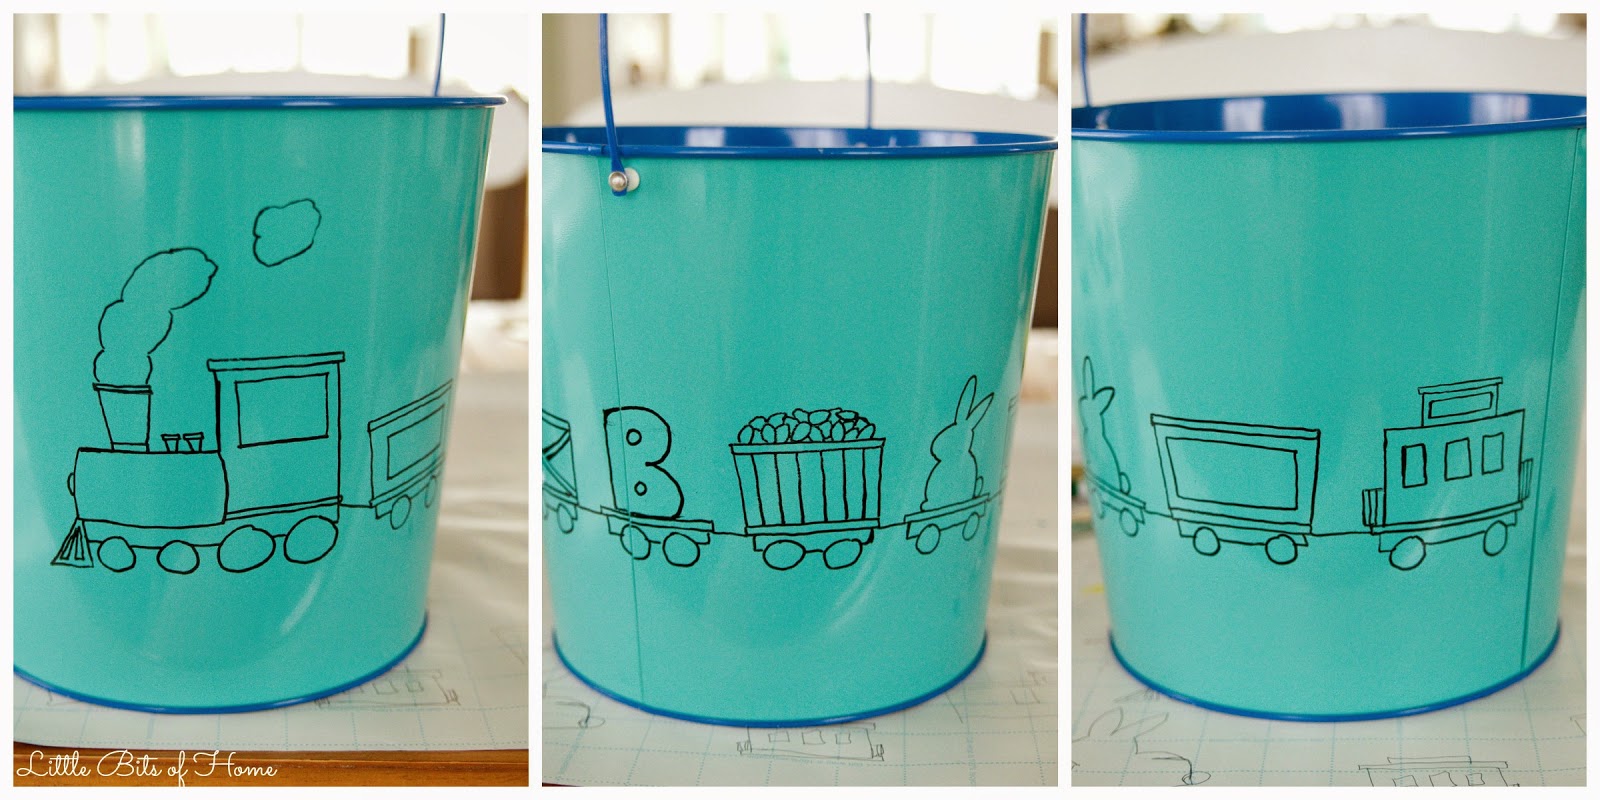
When we got home, I decided it was just too plain, so I asked Little Man if he wanted me to paint something on it. Without missing a beat, he requested a train. Duh-- I should have guessed that! :)
I got out my black paint pen (I used this one) and cheap acrylic paints and started doodling on his Easter bucket. I'm not the best at drawing, so it's far from perfect, that's for sure. Little Man was sitting next to me telling me how to draw the train and which type of train cars should come next. Train drawing is a very precise thing, apparently. ;)
After I drew the outlines, I started filling it in with paint, letting Little Man decide the colors I used. I did have to reign him in a bit, though, or every wheel and tiny detail would have had five colors of paint on it. Haha! 

The first coat went on super thin and transparent. I just roughly painted it in to give the following coats something to stick to. Here it is after the first coat...
It took a total of three coats of paint. I waited for each coat to dry before applying the next coat. When the paint was all dry, I brushed on two coats of Mod Podge to seal it in. 

Here it is all finished and dry! It may look like a kid drew it, but Little Man loves it and that's all that matters! 
What's an Easter train without a car full of Easter eggs (or jelly beans like my hubby thought) and an Easter bunny?!
I was really afraid that the paint would scratch off, but Little Man has already used the basket at our neighborhood egg hunt and it help up beautifully! The two coats of Mod Podge did the trick sealing the paint and there's not a single scratch! 

So, if you are having trouble finding an Easter basket that you like, why not paint your own? 


Tuesday, March 17, 2015

A Touch of Easter

Hi Friends! Are you getting ready for Easter? I can't believe it's almost here! I typically don't decorate very much for Easter other than buying a bouquet of tulips for the dining room table. But, with two little kids at home, I'm trying to incorporate some more Easter touches without everything getting too pastel up in here. ;) Here's what I came up with!

Tulips are an Easter staple! I picked up this inexpensive bunch at Trader Joe's. They have such a great selection of flowers and are priced very well!
The vase and table runner are from World Market. Is anyone else as obsessed with World Market as I am?!
I printed off a couple Easter printables from my recent roundup to sprinkle around the house. See that jar of Cadbury eggs? Demolished. History. In our bellies. Hello extra 5 pounds, where did you come from?! Note to self, leaving candy out in the open is way too tempting!
While I was browsing Trader Joe's amazing floral selection, I couldn't resist picking up these ranunculus! Aren't they gorgeous?!
I considered putting them on my dining room cabinet like this, but ended up needing them to take the place of the empty jar of Cabury eggs in my entryway. Ha!
My bestie Amy and I found these adorable bunny garlands in the Target dollar spot a couple weeks ago. Our husbands had a conversation about our matching bunny garlands. I think eye rolling was involved. Ha! But, they're used to use sharing ideas by now. ;)
I couldn't resist adding a little, white pom pom tail! Little Man loved the tails! 
Funny story-- I've seen a couple posts about painting and speckling cheap, plastic Easter eggs. I gave it a whirl, but failed miserably because I used craft paint instead of chalk paint. Then, just a couple days after I posted on Instagram about my miserable fail, Amy and I spotted these cute eggs in the Target dollar spot! They were cheap and looked exactly like I was trying to paint my eggs. Score! 
These glass candle holders from Yankee Candle Co have a lot of mileage on them! Jeremy bought them for me 9 or 10 years ago. I love filling them with seasonal decor! I decided to remove the glass votive holder that sits on top so that I could add more eggs.
Hope you enjoyed this little tour of our Easter touches! Looking forward to celebrating that Jesus is alive!


Related Posts Plugin for WordPress, Blogger...